Latex Tutorial: Lecture 2 – The documentclass command
I hope everyone had a successful installation of LaTeX on their machine. Today, we’ll take a look at the “\documentclass” command. This command tells LaTeX what type of document is being created. The syntax for this command is as follows.
 \documentclass[optional-arguments]{document-type}
Invariably, a LaTeX document starts with a “\documentclass” command. Any optional argument passed to LaTeX is written in square([]) brackets. As the name suggests, they are optional. If no optional arguments are passed, the default values are taken. The document type can range from a letter to slides ( yes, you can create wonderful presentations using LaTeX). Some common document classes are article, report, book and slides. All these are defined in class files saved with the extension .cls. Basically, any document type must have a properly defined class file. Other than these basic classes, one can have customized class files, which will be dealt with later.
Hello world!
Welcome to WordPress.com. This is your first post. Edit or delete it and start blogging!
Installing Windows on a MAC using BOOT CAMP

This is for those who wish to dual boot their MAC with Windows. Whether you accept it or not, Windows is quite popular among the masses and the profusion of useful windows specific software forces MAC users to install it on their beasts even if they don’t quite like it. Compatibility with other Windows users is another driving factor for the necessity to install Windows. Apple made this possible with their Intel transition in 2006. Boot Camp made the process very simple with its introduction along with MAC OS 10.5 (Leopard). Boot Camp has seen an upgrade to version 3 with the release of MAC OS 10.6 (Snow Leopard), with support for Windows 7. Let us go through this simple process without further delay.
In a nutshell, we have to create a partition on which Windows needs to be installed. This is taken care of by the Boot Camp Assistant located in the Utilities folder. Before going into all this, I strongly recommend you to update your machine with the latest firmware and software updates provided by Apple. I am assuming that you are running Snow Leopard and that you want to install Windows 7. The procedure is not too different for installing other versions of Windows. Please note that for installing Windows 7, you require version 3 of Boot Camp. Snow Leopard comes with version 3 of Boot Camp. Just remember to back-up your data before doing any experiments of this sort. Also make sure that you read the manual for the Boot Camp Assistant and that you are installing a compatible version of Windows on your MAC. The manual is available for download and may also be available on the Snow Leopard installation disc.
Open the Boot Camp Assistant from the Utilities folder. You’ll be shown this screen.


Once you decide upon the size for the installation, click “Partition”. The Assistant allocates space of the specified size. If you are ready for the installation, just pop-in the Windows installation disc and click ” Start Installation”. Your computer starts-up from the windows installation disc that you inserted.

The next key step is partitioning the “Correct” partition. The partition created by the Boot Camp Assistant will be named “BOOTCAMP”. Although it indicates the partition type to be FAT32, it is actually not formatted. One faces a dilemma here -Which type of partition to choose, FAT32 or NTFS. I would advice the reader to go for NTFS for its relative advantages. Partitions of size greater than 32 GB need to be formatted with NTFS. To format the partition in Windows 7, click on “Drive Options (Advanced)” and then “Format”. By default, MAC OS doesn’t allow one to write on NTFS partitions but there’s this tool called MacFUSE, available here, that comes to the rescue.

Enable backspace to take you to the previous page in firefox

For a change, a small tip for people who use keyboard shortcuts for navigation in the web browser. I’ve been using this feature in IE and Safari. I recently noticed that this doesn’t work by default in firefox (Ubuntu). To enable this feature, open a firefox window and type ‘about:config’ (without the quotes). Search for ‘backspace’ in the filter tab. The only entry for backspace will be ‘browser.backspace_action’. Right click on it and modify the entry to ‘0’ from the default value. There you go. Now, you can use backspace to go to the previous page/s you were viewing.
Latex Tutorial: Lecture 1

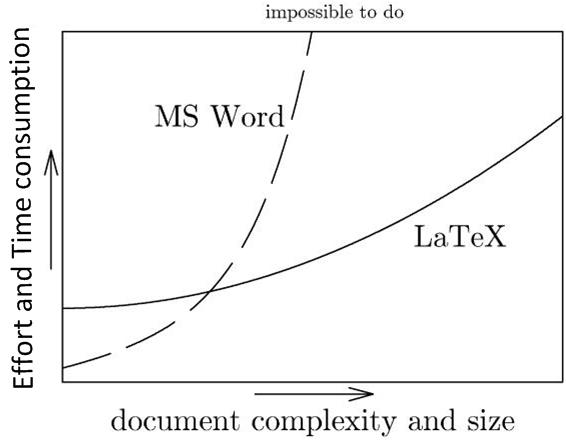
OK guys. I’ve decided to write a series of blogs on how to start using LaTeX. This is for people who are willing to make a switch from MS-WORD/Open-Office/Pages to LaTeX to prepare their complex documents. The reason I use the word ‘Complex’ will be evident either later in the post or some other post that I will write later. First up, I’ll cover the installation part on 3 Operating Systems (Mac OS X, Windows and Linux). This will be equivalent to overcoming a major hurdle for newbies (That’s how I felt when I began learning LaTeX). Installing is not difficult, but a bit confusing. Hence, I’ve decided to dedicate a complete post to that. I plan to go in a step-by-step manner on how LaTeX works. Firstly, I’ll start off by showing y’all a picture I came across on the Internet. This picture summarizes the need to make the switch when preparing complex documents.
The most important advantage of LaTeX is that you need not worry about formatting the document. Globally specified, the formatting remains the same throughout the document. Just worry about the CONTENT. Preparing complex documents like, say a Book, becomes a tedious task once you have to keep adjusting the position of text relative to the figures and tables in the document. You end up spending more time formatting the document than adding content to it. More on the advantages sometime later. My attempt here is to encourage more people to use LaTeX. This post is not to condemn or highlight the short-comings of Word processors. Every person has their own comfort zone and being a tech geek, I would prefer preparing complex documents in LaTeX. For people who are not tech-savvy, better stick to word processors. So, decide if you are willing to give LaTeX a try before continuing to read further.
INSTALLATION
We can divide LaTeX installation into two parts. 1) Installation of packages and associated files required to run LaTeX. (This is sufficient to run LaTeX). 2) An editor where you can type-set your document. An OS like Linux/MAC OS X has built-in editors like ’emacs’ that can help you compile LaTeX documents. For those who are not too familiar with the Command Line Interface (CLI), I would suggest you to follow both the steps. We can compare steps 1 and 2 to a C compiler. To run a C program, one requires a C compiler. Turbo C/C++ forms both the editor and Compiler. You require a compiler to run your documents, even if you don’t use the Turbo C/C++ editor. The packages and associated files can be equated to the compiler. Editors gives you varying degrees of satisfaction with some enhanced features and wizards in typesetting documents. To start off, I would suggest that you follow both steps . If you are familiar with emacs or other editors and don’t have a problem using the CLI, then you can stop with step 1.
MAC OS X
Way back in 2006, the Apple Blog (TAB) had a post on the options available for installing and using LaTeX on MAC OS X. Since I’ve never used LaTeX on MAC OS, I would summarize what that post contains. MacTeX is a package that is most useful to start-off with. It contains both the packages and the editor. Just give a default install when doing it for the first time. As and when you become familiar with LaTeX and become comfortable with the word ‘Packages’, you can explore the package manager. For now, just remember that packages are add-ons that allow additional functionality. You will understand what packages do once you have a firm grip on the basics.
Windows
Two popular Package managers in Windows are MikTeX and TeXlive. TeXlive is available for download as an ISO image and will be helpful if you need to install additional packages. Additional packages available on CD can be installed directly. Since the list of packages is exhaustive, you may not find all the packages on the CD. Only the most popularly used packages are available on the CD. MikTeX requires the internet for installation of additional packages. This is by no means an exhaustive list of package managers on the Windows platform. There could be others that I am not aware of. An advantage of using the popular ones is that you can be sure of having the latest packages installed. There are many editors available out there and I will be sticking to the ones I have used. WinEdt is a popular one but pricey. The Windows equivalent of Kile (see below) is TeXmaker. It is an open-source editor.There are a variety of editors available for Windows. I use LaTeX on linux and am not aware of other Windows TeX editors.
Linux
Since I am a fan of Ubuntu, the installation instructions that I give out will be keeping Ubuntu in mind. The procedure could be slightly different for other Linux OSs. Every linux OS is equipped with a package manager (Synaptic in Ubuntu). It contains a complete list of software that is installed on the machine and that is available for installation. Later versions of Ubuntu have a graphical interface for installing software via the Ubuntu Software Center. For newbies, I would recommend using the latter option, which is hassle free. Search for TeXlive (which is the default package manager for LaTeX in Linux). MikTeX is not available and for the other package manager for linux, TeTex, development has been stalled. I recently read a post where they’ve mentioned that the other Linux OSs that used TeTex are also migrating to TeXlive. Kile is a really good editor for Linux. Apart from a smooth interface, it possesses some nice tools which saves you a lot of time when typesetting documents. There is a Windows equivalent for Kile which is called TeX Maker. My suggestion would be to install Kile as the editor. There are other editors too, but my personal preference would be Kile. The best way to install LaTeX in linux is to install Kile. All the necessary files are installed along with it.
Finally, I’ve reached the end of my post. Please post your comments/suggestions/questions if any to help me improve my posts. Also tell me if the installation worked for you (If you reached the end of the document). 😉
Speed dial websites on firefox

Firefox has a built-in feature to speed-dial websites. The trick here is to bookmark a web-page and attach a keyword to it. There’s a difference between attaching a ‘tag’ and ‘keyword’.
So, once you decide upon a list of websites that you would like to speed dial, open the ‘Organize Bookmarks’ link by holding Ctrl+Shift+O else open it via. the Bookmarks tab.

Select ‘New bookmark’. A screenshot is attached, where-in I have added the HDFC bank login with the keyword ‘HDFC’. Note that the keywords are case-insensitive. So, even if I type ‘hdfc’ instead of ‘HDFC’ (note the case), firefox would open-up the login for HDFC bank. Even though this is a simple technique, not many are aware of this. The good thing is you can even have numbers as a keyword for a website.
If you decide to export your bookmarks to another browser, say ‘Google Chrome’ for example, you would not lose out on this feature. I haven’t tried it on Safari or Internet Explorer so far. Tell me if it works for you!

How to make the headphone socket work with ubuntu 9.10 and Macbook 2,1

I’ve been having this issue for sometime now and never realized that the solution is pretty simple. Whenever I plug-in a headphone into the headphone-socket on my macbook running Ubuntu 9.10, it never worked. Assuming that there was some problem with the headphone I continued using the speakers. However, the headphone worked on my other OSs.
One fine day, curiosity got the better of me and I wanted to sort this out. It didn’t take me a long time to find a solution. This issue was already raised in the Ubuntu forums and has worked for many people. Click here to find out.
Just run the command ‘alsamixer’ (without the quotes) in terminal and press the key ‘m’ (without the quotes again). The default setting for the headphone jack is muted and one just has to unmute it.
Make Safari open new windows in tabs
defaults write com.apple.Safari TargetedClicksCreateTabs -bool true
Note that this trick is for Safari 4 and below versions. In Safari 5, there’s an
option in the preferences window which allows one to change the setting such
that new pages always open in new tabs. A screenshot is attached.

Converting VISIO images to EPS
Sorry for being offline for so long. My triple-boot experiment has been a success. Now I run Snow Leopard, Ubuntu 9.10 and Windows XP. I’ll write about this experiment sometime later. This week, I have something more interesting (according to me 😉 )
Fortunately, i got an idea for my next blog entry this weekend. I had to convert a few VISIO images to EPS (Encapsulated Post Script) to attach them to report, to be prepared in latex.
For those of you who don’t know about EPS format, EPS is a scalable vector format. Basically, you can scale the image and make it smaller/larger without losing its quality. EPS images are frequently used in preparing latex documents.
According to me, the best way to convert a VISIO file to an EPS file is as follows.
Pre-requisite: Install open-office
Step 1: Save the VISIO file in .wmf (Windows Meta File) format.
Step 2: Open this file using Openoffice Draw (Equivalent to VISIO, but open source).
Step 3: Right Click on the image and say “Save as Picture…”.
Step 4: Change the type to EPS.
Since Openoffice is available on the 3 platforms I use, it makes my job a lot more simpler. I tried converting the “.wmf” file in both ubuntu and windows using draw and it worked like a charm. There was absolutely no difference in the quality of the output images.
Here are a couple of screenshots.

I also came across a wmf2eps converter. It’s available here
The pleasure you obtain when you do something all by yourself is immense and I would like to stick to my methodology. During this exercise of getting my VISIO images converted to EPS, I came across various printer drivers that allow one to print the image as a PS(post-script) or EPS. A major glitch in this process is that the quality of the final image is not guaranteed to be as good as the original one. I also understand that VISIO2002 allowed one to save images in EPS format.
Solution for kernel panic in Ubuntu 9.10
Ever since i started using linux (Ubuntu 6.06), I’ve always wanted to explore its features. As a tech-geek, it is imperative for anyone to try out new things and I was no exception. Back then, one had to manually mount windows partitions by modifying the ‘fstab’ file. I wouldn’t say that it was an easy task, but I was willing to take such risks because I had a spare 40GB drive on my desktop. Any experiment would be done only on the 40 GB drive and this gave me a free hand to wipe out the HD if something went wrong.
